- WebsiteBaker
- API
- Google Drive
- Google Sites
- Yahoo SiteBuilder
- Issue
- Mobile
- Customizing
- Tutorial
- Watermark
- Free Download
- Crack
- Dreamweaver
- Xara
- Coffeecup
- Blogger
- Iweb
- Wordpress
- Video Tutorial
- Weebly
- PHP
- ASP.NET
- Joomla
Slider Demos
-
 javascript gallery
Megalopolis Layout
with Slices Transition
-
 slider demo
Mellow Layout
with Blast Transition
-
 jquery banner slider
Pinboard Skin
with Fly Transition
More Demos: Bootstrap carousel, Slick slider, Bootstrap slider, HTML slider, Slick carousel, Bootstrap carousel, HTML slideshow, CSS Slideshow, jQuery carousel, Image carousel
How to make a slider as a background of your page
First of all open your WOWSlider application. Then you should add images, select a transition effect... Please see another tutorials to get the detailed instructions of how to do it: tutorial 1, tutorial 2
Now let's see how to set a slider as a background of your page:
1. Set the specific options
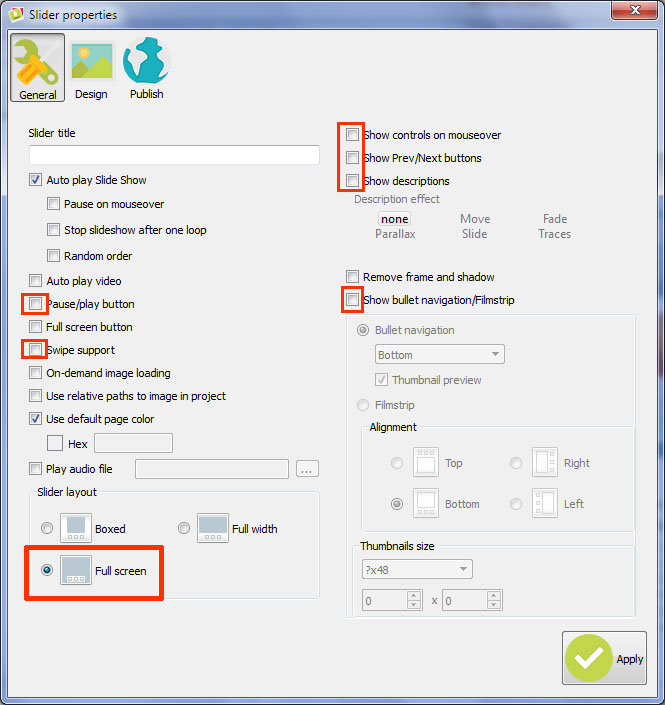
Go to Slider -> Properties and uncheck the following options:
- Pause/play button
- Swipe Support
- Show controls on mouse over
- Show Prev/Next buttons
- Show descriptions
- Show bullet navigation/Filmstrip
Set the Slider Layout to 'Full screen'
2. Publish the slider
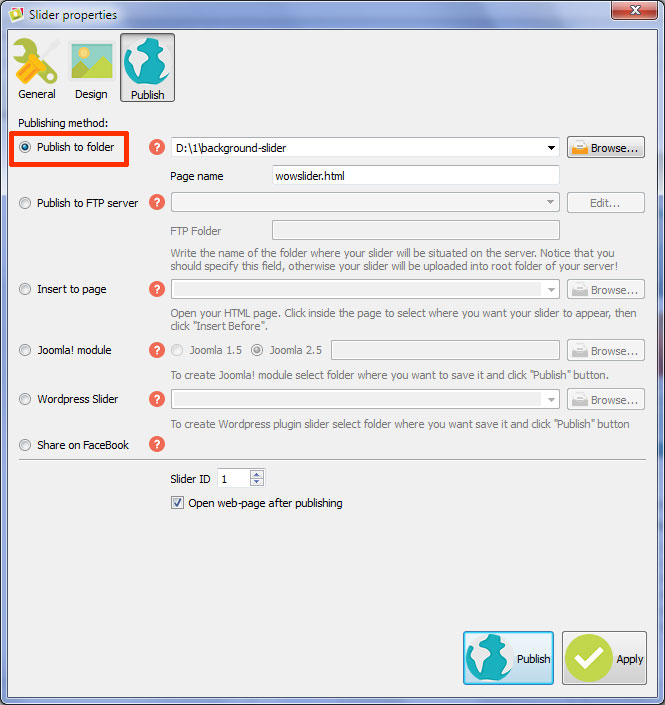
Go to the 'Publish' tab and select the 'Publish to folder' method. Choose the folder where you want to save the slider.
Click on the 'Publish' button at the bottom of this window.
3. Copy the generated folders
Open the folder where you have just published the slider. Copy the 'data1' and 'engine1' folders and paste them in your website's folder.

4. Embed the code to your web page
Now open the generated 'wowslider-howto.html' page and copy a code for the HEAD section.

Paste it in the HEAD section of your web page.

Go back to the 'wowslider-howto.html' file and copy a code for the BODY section.
Paste it in the end of your website's BODY section.

5. Create a new file
Now Create the 'ws-bg.css' file in your website's folder with the following code:
#wowslider-container1 {
		position: absolute;
		top: 0;
		left: 0;
		z-index: 0;
	}

	.content {
		position: absolute;
		top: 0;
		left: 0;
		bottom: 0;
		right: 0;
		overflow: auto;
		z-index: 1;
	}
6. Add a link to the created file after the HEAD section of your slider.
<link rel="stylesheet" type="text/css" href="ws-bg.css" />
7. Put the content of your page into the <DIV> element with the "content" class:
<div class="content">
------
'your content here'
------
</div>
Now you have a slider as a background of your web page!
